Project Creation
How to create a project in zapAnalytics
To create a project, you will need a “Content-Bundle” provided by zapliance. This file contains the selected company codes, fiscal years, and SAP client information. It will be delivered once the requested information has been provided by the customer.
The project creation can be arranged as follows:
- New Project
Choose the button “New Project” to start the project setup.
![]()
2. Upload the Bundle File
Upload the “Content-Bundle” provided by zapliance. This file contains the required data for the project and was generated based on your input about the company codes and fiscal years.

3. Name the Project and Select Language
After uploading the Content-Bundle, assign a name to the project and select the language for the project results.
Click the “Create“ button to proceed.
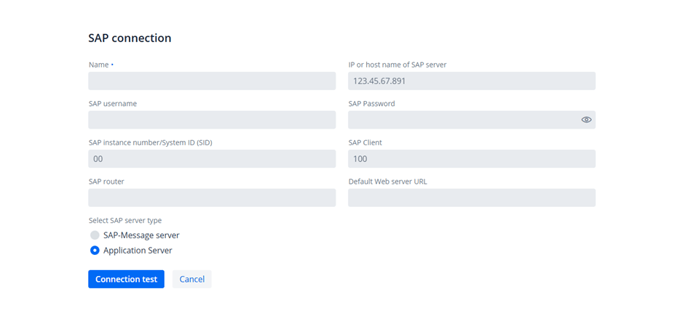
 4. SAP Connection
You can select SAP connection details from the dropdown menu if they have already been configured once.

Choose the “+” button to create a new SAP connection. Provide the required SAP connection details based on whether it is a Message Server or an Application Server:

Detailed information you will find in following Knowledge Base article:
Establishing Connection with a SAP Message Server
Establishing Connection with a SAP Application Server
After entering the information: Choose the " Connection test” button to test the connection. If the test is successful, you can proceed to the next steps.
5. Configure Parameters for zapAnalytics
Select the processing language for the project and then choose "Next” to continue. The advanced settings should be made in consultation with zapliance.

6. Start the Project Processing
Go to the “Project Overview” and choose the "Start" button to begin.
You will be prompted to conduct the "extended connection test".
This will test all required access rights and gives a list of all missing permissions.
If this test is successful, the project processing can be started

7. Start Data Processing
Now, the data processing will be started. Therefore please choose the button "Start project processing".
